Transform your home into a colourful studio with these simple egg decorating ideas, tips and tricks from the "Eggs-perts". Egg decorating has been enjoyed around the world for centuries.
Get the spring spirit flowing in your home with these fun, kid-friendly egg decorating techniques. We have put together this step-by-step guide to help make egg decorating an adventure for the whole family.
Egg Colouring and decorating can be fun for children of all ages.
Eggs to be coloured and decorated can be raw, blown or hard-cooked. Hard-cooked eggs are easier to handle by small children because they aren't as fragile as raw or blown eggs.
If you're looking for even more Easter activities, check out the following resources!
Eggs should be "hard-cooked", not "hard-boiled"; boiling eggs produces tough rubbery whites and dark rings around the yolks.
Place cold eggs in a single layer in a sauce pan. Add enough water to come at least one inch (2.5cm) above the eggs. Cover and quickly bring to boiling. Remove pan from heat to prevent further boiling and let eggs stand, covered, in the hot water for 20-25 minutes. Drain and immediately run cold water over they eggs until they are completely cooled.
Eggs that have ages about a week in the refrigerator work best for hard-cooking. When you want to enjoy them later on in egg salad or as a pickled egg, they will peel more easily than eggs fresh from the grocery store.
To remove the contents of an egg, begin by washing and drying the egg. Pierce both ends with a large needle. Slightly enlarge the hole on the wider end of the egg. Push the needle well into the egg in order to break the yolk. Hold the egg over a bowl and with the wide end down, blow into the hole at the opposite end until all the egg is removed. Rinse shell with cold water and allow to dry thoroughly.
You can now use the raw egg for an omelette, quiche or scrambled eggs!
 The first step to prepare your egg for decorating is to decide if you will blow out your egg or hard-cook it. If you want to keep your egg ornament for years to come, you will need to empty the raw egg. Otherwise, hard boil your egg for a temporary decoration.
"Eggs-pert" Tip: It’s recommended that you dye your egg first if you’re going to blow it out in order to make submerging the egg in the dye easier.
Decorating eggs is an art form that began centuries ago and usually involved dyeing eggs extravagant colours. Tints of times past were made from fruits, leaves, bark, coffee and roots but for today’s busy households, far too time consuming! Luckily, we have a simpler way for your family to create colourful eggs.
- Make sure your work station is protected with newspaper or plastic.
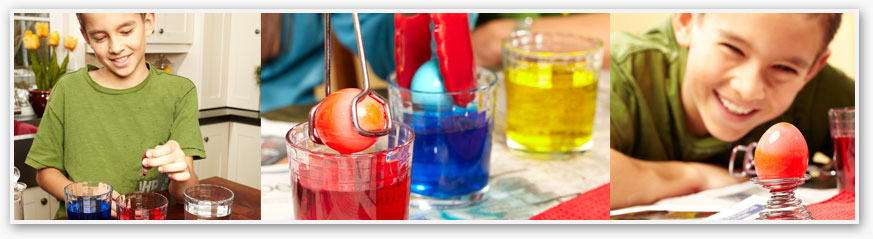
- In a large heatproof bowl deep enough to submerge your egg completely, mix one teaspoon of vinegar and 20 drops of food colouring (use more to intensify the colour) in one cup of warm water.
"Eggs-pert" Tip: The vinegar makes it easier for the dye to seep into the shell.
- Submerge eggs for three minutes for light colours and ten minutes or more for deeper shades. Use tongs to handle eggs easily. Let the eggs dry completely for 20 minutes on a drying rack.
"Eggs-pert" Tip: We recommend turning your eggs half way through the drying time to make sure the egg dries completely.
- Be the "Eggs-pert": To make a two-toned egg, dye the whole egg first in a light colour, let dry for 15 minutes, and then submerge half into a darker colour. Or, try using brown eggs to vary shades.
Use this technique for a psychedelic colour "eggs-perience"!
"Eggs-pert" Tip: Hard-cooked eggs work better for this style because they are less fragile to work with.
- Over a sink, place one hard-boiled egg in a colander and coat with vinegar.
- Choose 2 to 3 colours maximum. Starting with the lightest colour, drip food colouring on the egg and gently roll in the colander for a few seconds to help spread the colour. Let the colour sit for minimum 30 seconds (more depending on your colour preference).
- Repeat step two with remaining colours, allowing each to set for minimum 30 seconds.
"Eggs-pert" Tip: To make the eggs extra psychedelic try wrapping them with two or three elastic bands before dying.
Dyeing eggs naturally is easy but requires all pots on deck as each colour needs its own pot to boil in. Place eggs in a pan and add water until the eggs are covered. Add one teaspoon of vinegar to help the colour seep to the eggs and add your choice of natural dye combinations. Bring the water to a boil, reduce heat and simmer for 15 minutes. Once you are pleased with the colour, remove the egg from the liquid and let dry.
"Eggs-pert" Tip: For a really intense colour, try soaking the egg overnight in the fridge.
Experiment with food stuff such as red onion skins, red cabbage, grape juice, beets, canned blueberries, cherries, turmeric, hibiscus tea, chili powder or fresh cilantro, and see what surprising colours you create.
"Eggs-pert" Tip: Naturally-coloured eggs won’t be glossy but you can rub a touch of cooking oil over the dyed egg to add some shine-time to your creation.
To blow out your egg out follow these steps: 
- Have mom or the closest adult use a push pin or sharp object to pierce both ends of the egg. Using your sharp object, make one hole bigger than the other.
- Poke a tooth pick through the larger hole to pierce and “stir” the yolk.
- Hold the egg, larger side down over a bowl, and blow the contents out.
- Set the egg contents aside and use one these recipes to make a tasty "egg-tastic" meal.
Now that your egg is colour-filled, let’s get decorating! Here are some simple techniques to try at home with the whole family.
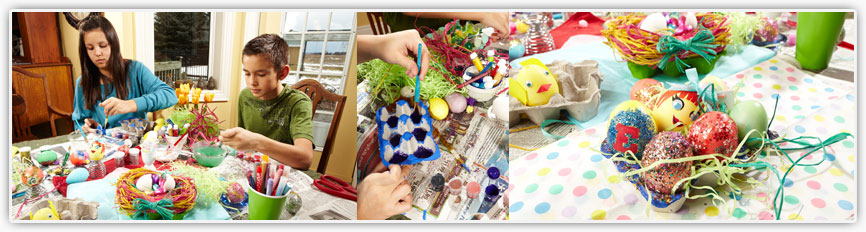
Use odds and ends on hand at home to add some pizzazz to your "cre-egg-tion"! Markers, paint sets, sparkles, ribbons and yarn work perfectly for decorating eggs without too much time, fuss, or money.
Stickers are a fun, inexpensive, fuss-free way to decorate eggs. Have several packages of stickers available for kids to choose from.
Use equal parts glue and water to make diluted craft glue. Take an already dyed egg, apply glue mixture using a paint brush or sponge to half of the egg. Sprinkle superfine glitter over the glue covered half of the egg. Let dry completely. Cover the remaining parts of the egg with glue mixture and cover with the same or different glitter. Instant Disco!
"Eggs-pert" Tip: Touch ups can always be made with funky stickers or more glitter.
Glam up a dreary egg carton with glitter, stickers or paint and place decorated eggs back in their homeland for a charming centrepiece that won’t roll away.
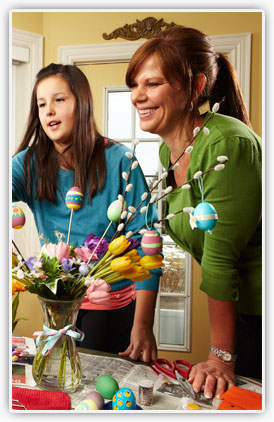
In some countries it is customary to celebrate the spring season by hanging hollow, decorative eggs from the branches of trees. Recreate the tradition this year at home and craft your own egg display.
- Thread the ends end of a thin ribbon (approx. ¼ cm [2.5 mm] in width) through a large-eyed needle.
- Gently pass the needle through the bottom hole of the egg, pulling the ribbon through to the top.
- Using your finger, create a 3-inch loop with the ribbon. Thread the needle back through the egg to the bottom.
- Double knot the loose ends and trim the excess ribbon.
- Your egg is ready to be displayed.
"Eggs-pert" Tip: Display your hanging egg using branches from your yard, Pussy Willows or a sturdy house plant.
Wow your guests and personalize your next spring dinner party with decorated eggs as place cards. Write names on a small piece of stock paper, cut out, and punch a small hole at both ends. String a ribbon through the name card and loop it around the egg, tie a knot in the ribbon to secure. Place the egg in an egg cup at each spot and watch the smiles appear.